Demystifying the Aurora Borealis: Where and How to Find This Must-See Phenomenon
By: Guest ContributorThe Aurora Borealis is a mystical phenomenon that tops bucket lists around the world. Known in Roman myths as the “dawn of the north,” these stunning light displays have captivated people for centuries.
Although this natural wonder is a must-see for most, it can be surprisingly difficult to nail down. Here’s a quick lowdown on what you should know.
What is the Aurora Borealis?

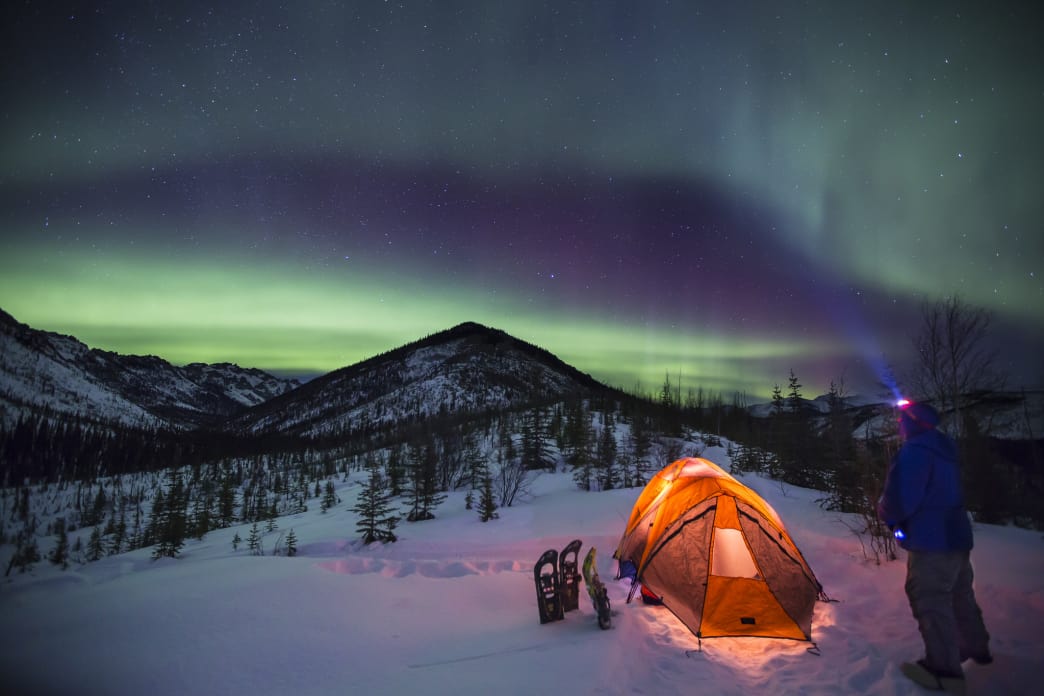
Also known as the Northern Lights, this natural phenomenon takes up the skies in the form of dancing lights. But they’re more than just dancing lights. An Aurora is actually electrically-charged particles from the sun that collide with the earth’s atmosphere. In the North, this display is called the Aurora Borealis and in the South it’s known as the Aurora Australis.
Where Can You See Them?

The best places to view the Northern Lights are in some of the farthest-reaching northern countries in the world—places like Norway, Iceland, Finland, Scotland, and northern Canada. Unfortunately, if you live in the States, the only consistent spot to see them is in Alaska.
Auroras occur primarily near the northern and southern magnetic poles, and they present an irregular, oval-shaped viewing area. Although, reports have shown that people have seen the northern lights as far south as New Orleans, these sorts of solar flares are rare.
The most important tip for finding the Aurora Borealis is actually searching for them. This phenomenon can be tricky to find sometimes and if you’re on a time crunch, you’ll want to get familiar with your aurora tracker (downloadable on smartphones) and plan on driving away from the city to avoid light pollution.
When to See Them & What to Look For

The Northern Lights are unpredictable, but chasing them is part of the fun. You’re ultimately relying on a ton of natural elements coming together to create the perfect viewing conditions. You’ll want to make special note on night length and the phase of the moon.
The Northern Lights never truly stop, but you wont see them during daylight hours. That means from about April to August they wont be visible due to increased daylight hours. The best times lie between September and March. These months bring more darkness to the northern locales and provide perfect conditions for viewing.
Additionally, the moon phase can determine how well you’ll be able to see the lights. A new moon is great, as the sky is in total darkness, but a partial moon can help lighten up some details in the foreground. If you’re facing a full moon though, the sky can appear too bright, and it’s likely that the lights will be somewhat washed out.
Aside from seasonality and moon-cycles, your most important feature to look for is the KP index—which is the global geomagnetic storm index. This scale ranges between 0 and 9, where a value of 0 means that there is little geomagnetic activity and a value of 9 means extreme geomagnetic storming. Of course, the higher the number, the stronger the solar storm and the more likely you are to see the lights in more southern regions. You can use an aurora tracker app on your smartphone to check these predictions. Generally these resources compile a bunch of data together to create the most accurate report possible. But keep in mind that the northern lights are tricky and even the app doesn’t guarantee a sighting.
Photographing the Northern Lights

The Northern Lights can be pretty difficult to photograph, especially if you’re not used to shooting in low light or at night. Occasionally, you can capture some of this spectacular display with your normal cell phone or point-and-shoot camera, but there would have to be a fairly strong solar storm to do this.
If you’re serious about photographing this phenomenon, it’s worth investing in at least a small DSLR. You’ll need to make sure that the camera you’re using will allow you to manipulate the ISO, shutter speed, and aperture. Depending on how strong the solar storm and how dark the sky is, you’ll need to play around with these three settings to find the perfect exposure at the time. Also, it’s crucial that you invest in a sturdy tripod. Otherwise, you may have to set your camera up on a rock if you can find one. Here are some tips for setting up your camera:
- Camera / Lens: Again, you’ll want to invest in a good DSLR with interchangeable lenses. Usually, you’ll receive a couple lenses with your camera. These should work for photographing the northern lights. Unless you’re intentionally zooming in on an object or spot in your landscape, you’ll want to make sure you’re using the smaller lens, generally with an 18-55mm zoom. This will ensure that you’ve got a wider angle than say a 70-200 mm zoom lens.
- Aperture: If you have a lens with an f-stop from f/2.8 to f/4, you’re on the right track.
- ISO: Keep your ISO between 1600 and 3200. Depending on your camera, 3200 might show up with a lot of noise so do your best to keep it in the lower range.
- Shutter Speed: Shutter speed can be a bit tricky. You’ll naturally want to set your camera to the lowest shutter speed, but if you can keep it around 15 or 20 seconds instead of 30, you’ll end up with more details in the stars. This is because the full 30-second exposure will capture the rotation of the earth and cause the stars to leave small streaks of light.
- Tripod: It’s very important that you come prepared with a tripod to keep the camera steady. If you don’t have a tripod, search for a spot with a stable rock to set your camera on.
- Location: If you’re trying to get a captivating image of the Aurora Borealis, try setting up with a nice foreground in your frame. This will make your shot more interesting and even bring in some perspective to the image.
Feel free to play with these settings, as your results may very each time. More importantly, don’t give up. It can be a little frustrating try to capture the northern lights especially for the first time, but keep in mind it takes some trial and error to get it right.
Written by Lauren Brooks for RootsRated.

